Role: Developer
Responsibilities: Developing
Overview
Student Planner is a all-in-one desktop manager application that allows students to manage their contacts, tasks, events and expenses. The user interacts with it using a CLI, and it has a GUI created with JavaFX. It is written in Java, and has about 10 kLoC.
Summary of contributions
-
Major enhancement: added the Expense tracker feature
-
What it does: allows the user to track the expenses and assist the user to analyse his/her spending habit
-
Justification: This feature improves the product significantly because a user may overspent but may not realise which category of his/her spending can be reduced. The user can use
monthlyExpensecommand to determine the expenses in which category can be cut down and useexpenseTrendcommand to check whether the monthly expenses has decreased. These commands assist the user to analyse his/her spending habit and make a better planing for the following month.
-
-
Minor enhancement: added autocomplete that allows the user to enter the command faster and provides a pre-filled format for the commands with parameter(s).
-
Code contributed: [Overview]
-
Other contributions:
Contributions to the User Guide
Given below are sections I contributed to the User Guide. They showcase my ability to write documentation targeting end-users. |
Adding an expense: addExpense
Adds an expense to the expense book
Format: addExpense c/CATEGORY v/VALUE d/DATE [t/TAG]…
| An expense can have any number of tags (including 0) |
Examples:
-
addExpense c/taobao v/1111.11 d/11/11/2018 -
addExpense c/Lunch v/6.66 d/10/10/2018 t/nomorecaipng t/fishtooexpensive
Editing an expense : editExpense
Edits an existing expense in the Expense book.
Format: edit INDEX [c/CATEGORY] [v/VALUE] [d/DATE] [t/TAG]…
Examples:
-
`editExpense 1 v/998.00
Edits the value of expense of the 1st expense -
editExpense 2 c/food t/lunch
Edits the category of the 2nd person to befood, remove the existing tags and add new tag.
Deleting an expense : deleteExpense
Deletes the specified expense from the expense book.
Format: deleteExpense INDEX
Examples:
-
delete 2
Deletes the 2nd expense in the expense book.
Undoing previous command : undoExpense
Restores the expense book to the state before the previous undoable command was executed.
Format: undoExpense
|
Undoable commands: those commands that modify the expense book’s content ( |
Examples:
-
deleteExpense 1
undoExpense(reverses thedeleteExpense 1command) -
expenseTrend
undoExpense
TheundoExpensecommand fails as there are no undoable commands executed previously. -
deleteExpense 1
clearExpense
undoExpense(reverses theclearExpensecommand)
undoExpense(reverses thedeleteExpense 1command)
Redoing the previously undone command : redoExpense
Reverses the most recent undoExpense command.
Format: redoExpense
Examples:
-
deleteExpense 1
undoExpense(reverses thedeleteExpense 1command)
redoExpense(reapplies thedeleteExpense 1command) -
deleteExpense 1
redoExpense
TheredoExpensecommand fails as there are noundoExpensecommands executed previously. -
deleteExpense 1
clearExpense
undoExpense(reverses theclearExpensecommand)
undoExpense(reverses thedeleteExpense 1command)
redoExpense(reapplies thedeleteExpense 1command)
redoExpense(reapplies theclearExpensecommand)
Clearing all expense entries : clearExpense
Clears all entries from the expense book.
Format: `clearExpense
Displaying expense trend : expenseTrend
Displays a bar chart of the monthly expense value occurred the past 6 months in a new window
Format: expenseTrend
Displaying monthly expense : monthlyExpense
Displays a pie chart of the expense value for each category occurred in the selected month in a new window
format: monthlyExpense MM/YYYY
Examples:
-
monthlyExpense 11/2018
Displays the monthly expense data for November 2018 in a new window
Contributions to the Developer Guide
Given below are sections I contributed to the Developer Guide. They showcase my ability to write technical documentation and the technical depth of my contributions to the project. |
Implementation
This section describes some noteworthy details on how certain features are implemented.
Expense tracker feature
The implementation of expense feature is similar to the Address Book, it has similar basic functions such as: addExpense clearExpense deleteExpense editExpense redoExpense undoExpense.
In addition, expenseTrend and monthlyExpense functions were implemented to assist the user in analysing his/her spending habit.
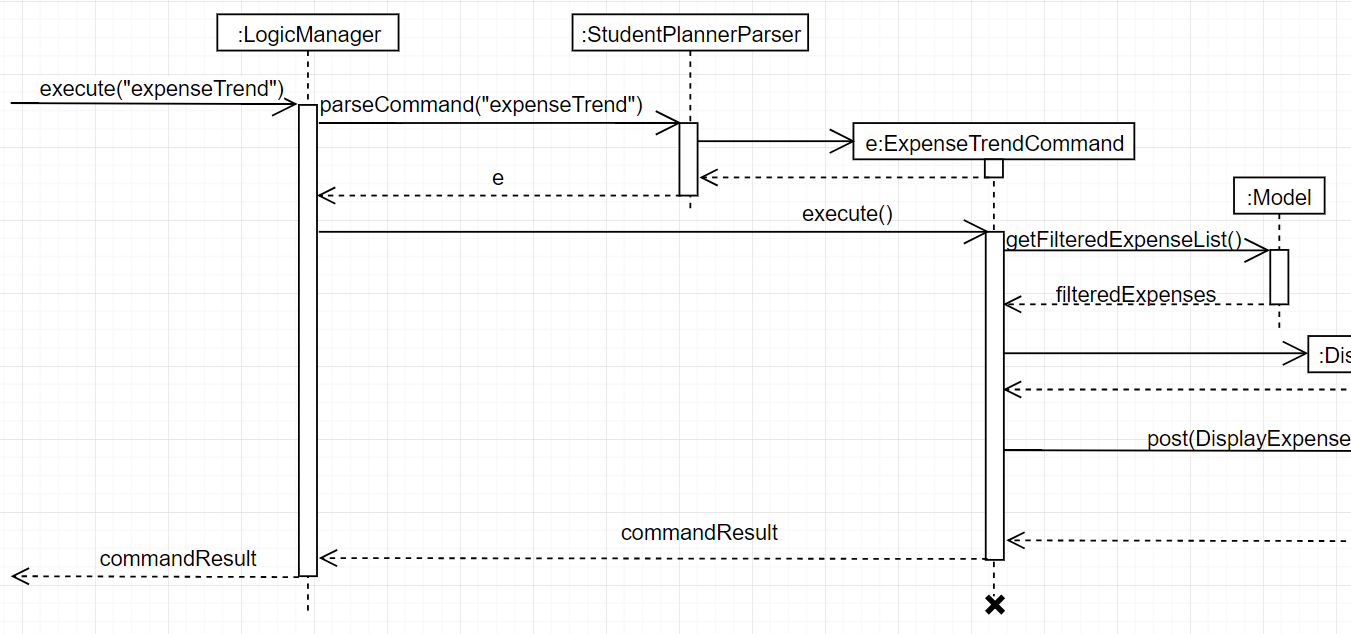
Expense trend
This function displays the total expense value for the past 6 months in a new window.
This function is facilitated by ExpenseTrendCommand, it extends the Command.
When user executes expenseTrend command, the command calls Model#getFilteredExpenseList() to obtain the list of expense, it then creates a TreeMap containing the expense trend data by calling getExpenseTrendData().
The list of expense will be filtered by the month of expense occurred in the getExpenseTrendData(), java.time.YearMonth is imported to obtain the current month and TreeMap is used to ensure that the months are sorted in ascending order.
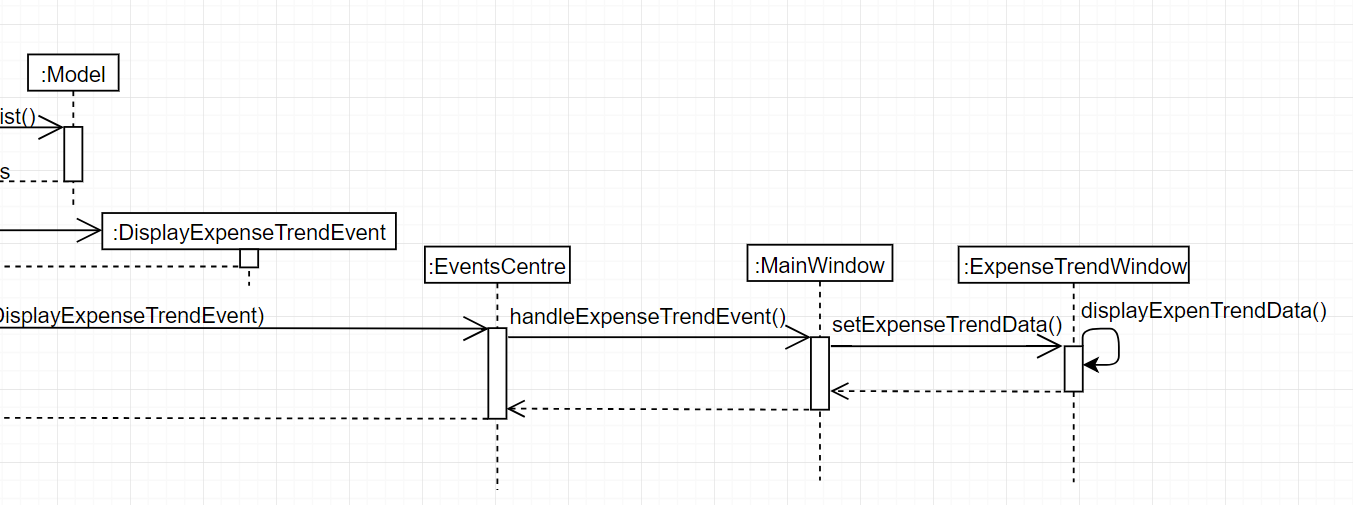
The command then calls EventsCenter#post(new DisplayExpenseTrendEvent(expenseTrendData)) to create an display expense trend event with the expense trend data, and pass the event to the EventCenter.
MainWindow will subscribe and handle the event, the expense trend data is passed to ExpenseTrendWindow by calling ExpenseTrendWindow#setExpenseTrendData().
ExpenseTrendWindow creates a bar chart with the data and open a new window to display the bar chart.
The following sequence diagram shows how the expense trend operation works:


Monthly expense
This function displays the expense value of each category for the selected month in a new window.
This function is facilitated by MonthlyExpenseCommand, it extends the Command.
When user executes monthlyExpense command, the MonthlyExpenseCommandParser will check if the parameter entered are in correct format and is a valid month. An error message is displayed if the parameter is incorrect, else a MonthlyExpenseCommand with the selected month will be instantiated.
the command then calls Model#getFilteredExpenseList() to obtain the list of expense, it also creates a HashMap containing the monthly expense data by calling getMonthlyData().
The list of expense will be filtered by the selected month in the getMonthlyExpenseData(), HashMap is used to ensure that to associate the expense value and its category.
The command then calls EventsCenter#post(new DisplayMonthlyExpenseEvent(monthlyData)) to create an display monthly expense event with the monthly expense data, and pass the event to the EventCenter.
The rest are similar to the Expense Trend but the data were represented in a pie chart instead of a bar chart.
The following sequence diagram shows how the monthly expense operation works:


Instructions for Manual Testing
Given below are instructions to test the app manually.
| These instructions only provide a starting point for testers to work on; testers are expected to do more exploratory testing. |
Displaying monthly expense
-
Displaying monthly expenses
-
Prerequisites: User has entered some expenses occurred in November 2018
-
Test case:
monthlyExpense 11/2018
Expected: Opens a new window with a pie chart displaying the percentage for each category of expenses. -
Test case:
monthlyExpense 10/2018
Expected: Opens a new window with a message "Expense not found in 10/2018" -
Test case:
monthlyExpense 13/2018+ Expected: No operation performed. Error message shown in the result display section -
Test case: Other incorrect monthly expense commands to try:
monthlyExpense,monthlyExpense 5/2018
Expected: same as the previous test case
-